People are adopting electric vehicles (EVs) like never before because they present both environmental benefits and economic value for transportation needs. EV owners can enjoy the convenience and time-saving benefits of installing a DIY EV charger at home. This guide presents step-by-step procedures for running electric vehicle charger installations safely and efficiently, following all required regulations.
How to Install an Electric Vehicle DIY Charger
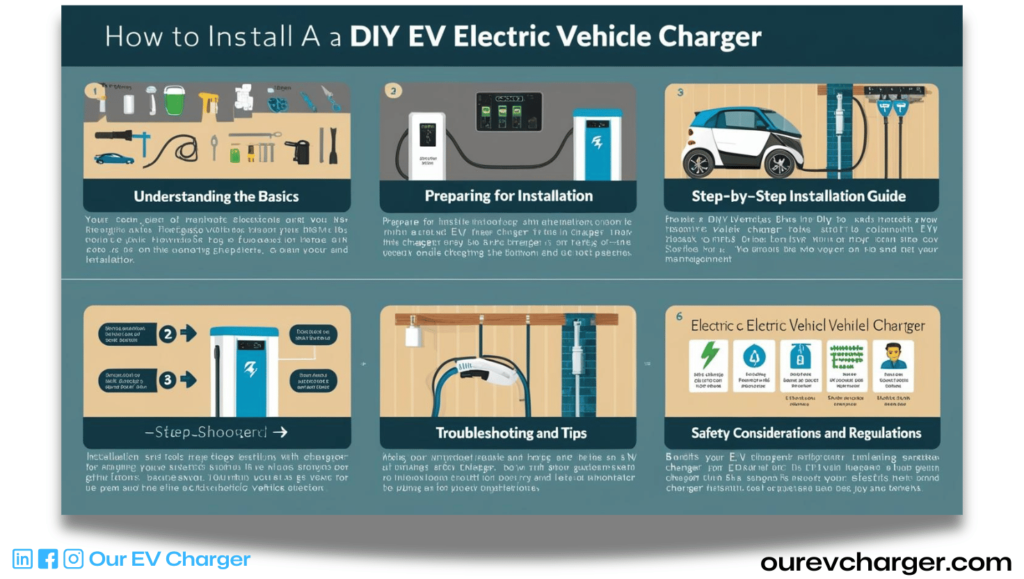
Understanding the Basics
What is an EV Charger?
With a home EV charging system, you can efficiently recharge your vehicle battery. Level 2 home chargers provide superior fast charging capability than Level 1 chargers, so they are strongly suggested for household needs. These devices operate on high voltages of 240V, so they charge your vehicle’s battevehicle’saster.
Essential Requirements Before Installation
Installation of an EV charger requires checking first that your home electrical system matches the required specifications. Professional electricians will evaluate your system’s charging capacity to decide whether system upgrades are needed. Furthermore, you require basic tools, including a drill,screwdriver, and voltage tester, as well as protective insulated gloves, before beginning your work.
Preparing for Installation
Step 1: Check Your Home’s ElectricHome’sel
To establish a dedicated circuit, check your home’s electrolyte for its current capacity. The power draw required for most EV chargers should start with a 40-amp breaker, yet specific higher-rated chargers might need additional amps for proper function. An outdated electrical panel should be replaced through consultation with a professional electrician.
Step 2: Choose the Right Location
Your EV charger setup depends heavily on picking an appropriate installation location. The site should be as close as possible to your parking zone for convenient charging access. Outdoor installments must have proper weatherproofing, but indoor locations should maintain sufficient ventilation.
Step 3: Gather Tools and Materials
Secure all required items among your tools, which must consist of wiring, conduit, and mounting brackets. Your materials need to pass safety tests so you can prevent future problems.
Step-by-Step Installation Guide
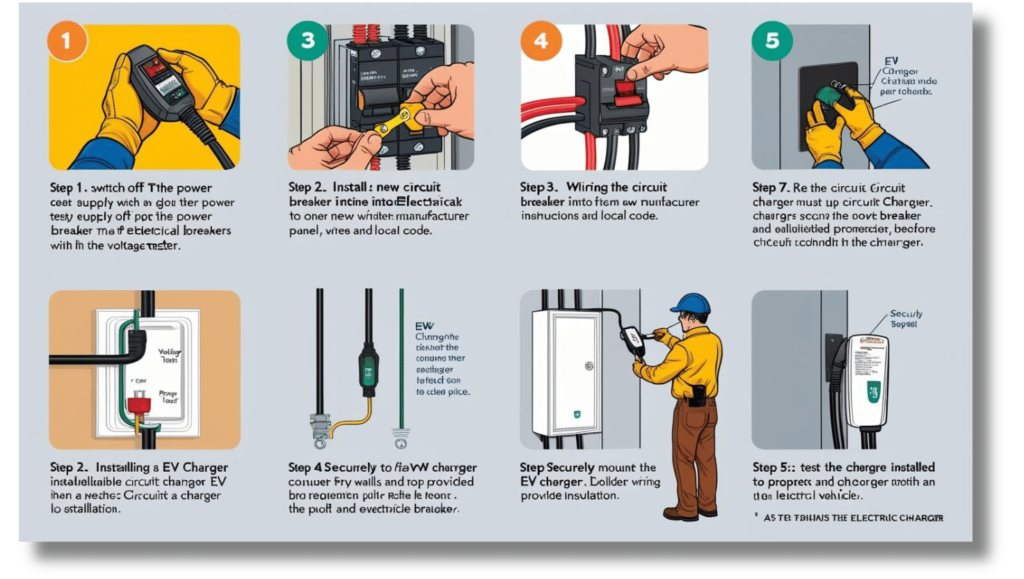
Step 1: Turn Off the Power
Safety comes first. Switch off the circuit’s power supply before beginning your work. The voltage tester will help you determine whether there is no power supply in the area where you plan to build the charger.
Step 2: Install the Circuit Breaker
Your electrical panel requires a special circuit breaker for installation. This circuit breaker will enable the primary switch function for your EV charger. When using manufacturer guidelines for installation, be careful to read both the wiring instructions and local code requirements.
Step 3: Lead wiring from the processing stage to where you install the system.
The wiring procedure extends from the circuit breaker installation point through to the charger’sarger’sion—protepermanentinstallationth conduits when installing your system, especially when your uipment sits outdoors. Check every connection to verify the correct insulation material to which the ial has been applied.
Step 4: Mount the Charger
Adhere to the instruction manual’s guidance about using the provided mounting brackets to attach the charger firmly to your wall surface. Tighten any attachments until the charger stands securely against the wall to prevent harm when you use it. Consult the charger owner’s manual owner’srect wire installation procedures.
Step 5: Test the Installation
Turn on the circuit breaker after the wiring is completed, then test the charger. Plug your electric vehicle in to check that it charges correctly. If you encounter any problems, seek assistance from a licensed electrician to perform diagnostic checks.
Troubleshooting and Tips
- Check the wiring connections when your charger won’t operate.
- Won’t the breaker panel does not carry the excessive load?
- Hermetic enclosures must always be followed precisely when using high-voltage equipment.
Safety Considerations and Regulations
Following the electrical codes that apply in your specific location is a necessary step during EV charger installation. A Ground Fault Circuit Interrupter (GFCI) should be added to your system to provide superior electrical shock protection. Through proper regular maintenance, your electric vehicle charger will operate efficiently while remaining safe over time.
Benefits of a DIY EV Charger Installation
Self-installing EV charging stations yields important advantages to property owners. Home installation delivers three-fold advantages: It reduces costs and provides increased value along with convenience. Using home-installed Level 2 chargers results in quicker recharging and makes electric vehicle operation more convenient.
Conclusion
Residential EV charging system installation can be achieved without excessive complexity. The right tools, careful planning, and a safety focus will enable you to benefit from vehicle charging at home. When your skills are l,imited or you feel uncomfortable tackling electrical work, please reach out to professionals. Happy charging!
1 thought on “How to Install an Electric Vehicle DIY Charger”